HerRoom is an online lingerie and men's underwear retailer based in Dallas, Texas. It was founded and is owned by Tomima Edmark, inventor of the Topsy Tail. HerRoom.com is the online destination for all things lingerie, offering dozens of name brands including Hanky Panky, Donna Karan, Calvin Klein, Spanx, Wonderbra and many more. HerRoom.com also offers a wealth of information on sizes, fabrics, styles and fitting to ensure that our customers look and feel their best. A unique site feature include Tomima’s Tips. HerRoom.com founder Tomima Edmark offers her special brand of expertise on how to find and wear the right lingerie styles for every situation and body type. Information sources and image credits goes to the only women operated, number 1 online lingerie store

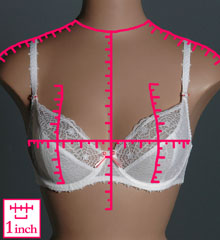
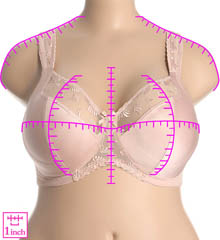
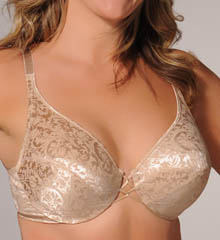
The Anatomy of a Bra
How it is made for your figure?
Knowing how a bra is cut and sewn can have a big impact on how it fits your unique shape. In this section we'll dissect each part and explain their function and how it affects your bra fit.

The Parts of A Bra | |
|
|
1. Cups
 There are 2 important points you should know about bra cups and their sizing:
1 - The same cup size letter on different band sizes does not mean the same cup size.
2 - If you are a DD cup size or larger, your cup size could be called many things.
1) A cup size letter, such as a C cup is not equal in volume across all band sizes. Here is an example. Say you are a 36C. If you move to a 38C, your band size goes up and so does your cup size by one cup size. If you move down to a 34C your band size goes down and so does your cup size by one cup size. If you want a larger band size but want to keep your same cup size, you should move to a 38B. If you want a smaller band size but want to keep your same cup size, you should move to a 34D.
I know, It’s a crazy fact, but true. So, why does the industry assign the same cup letter to different band sizes, when the cup size is not equal?
The cup size letter is actually a measurement of how far your breasts project from your chest wall. Each letter denotes a 1" increase in your body’s circumference around your bustline. These illustrations below explain this best. When you take your bust circumference measurement and subtract your underbust circumference measurement, the remaining inches represent your cup size. A C-Cup, for example is 3" difference between these 2 measurements. But a 3" difference is a big deal with small band sized women, but not such a big deal with larger bandsize women. So, this is why a C cup shape and depth changes with each band size.
2) Women with cup sizes larger than a D cup have an added challenge because many bra manufacturers have chosen to create their own letter naming conventions. For example, a DDD cup size is called an E cup size in some brands, and an F cup size in yet other brands. So, if you don’t know how a certain brand names their cups, you can wind up with the wrong cup size and think the bra is running too small or too large in the cups.
My suggestion is to figure out how many cup sizes larger you are than a D cup. Say you are a G cup size in Chantelle. This means you are 3 sizes larger than a D cup. Now, you can look at any bra, see how they name their cup sizes, and count up 3 cup sizes from their D to find your size.
Bra Cup Styles
There are a variety of bra cup styles. Here is a list along with a description.
- Contour Cups - Contour cups are lined with a thin layer of foam for modesty. They are usually seamless, but can also have seams.
- Cut & Sew Cups - This is another term for cups with seams. They are many times also called 3-part cups and 4-part cups. Cut & sew cups are the most supportive cups. The more seams, the more supportive a cut & sew cup becomes.
- Demi Cups - A demi cup provides less upper breast coverage. Also called a half cup, this cup style is designed to expose to upper half of your breast, and usually comes with wide-set bra straps.
- Full Cups - These cups are designed to cover all or most of each breast.
- Minimizer Cups - Minimizer cups reduce the projection of your breasts, so these cups are more shallow and wider than average bra cups.
- Molded Cups - Any bra cup that has built-in breast shape formed from a molding machine. Molded cups are usually seamless and unlined.
- Multi-Part Cups
- This is another name for cut & sew cups. A multi-part cup means
there are several fabric pieces used to create each cup. Most lace
cups are multi-part. And, multi-part cups are always the most
supportive bra cups.
- 2-Part Cup Bras
- 3-Part Cup Bras
- 4-Part Cup Bras
- 5-Part Cup Bras
- Padded Cups - A bra cup with padding included.
- Petite Cups - A bra designed for a woman with a short and/or petite build. The cups will be paired down and sewn closer together. Many pre-teen bras are made with petite cups.
- Push-up Cups - The bottom of the cup has padding to push your breasts up to give them a fuller look.
- Seamless Cups - A bra cup without any seams. This
style of cup almost always has a breast shape pre-determined by a
molding machine. A seamless cup can also be a contour cup where it is
lined with a thin layer of foam for modesty. A seamless cup can be
rigid or stretchy.
- Soft Cups - This is another name for cups without underwires. Other names for this type of cup are wire-free cups and wireless cups.
- Support Sling/Panel Cups - An internal piece
of stiff support fabric sewn inside the cup or incorporated into the
design of the cups. A support sling is kind of like a hammock sewn in
along the bottom and sides of the cups to give additional support to the
breasts. A support panel is generally a vertical panel placed along
the arm edge of the bra cup. It helps push the breast tissue under ones
arms forward for a more flattering and thinning look. There are also
support panels that totally encircle the edges of your bra cups. These
panels create clear breast definition and move your breast tissue in a
forward position.
2. Multi-Part Cups
 Multi-Part Cups - Also called "cut & sew cups" and "seamed cups"
this is where there are seams in the cups. There are several seamed cup
variations:
Multi-Part Cups - Also called "cut & sew cups" and "seamed cups"
this is where there are seams in the cups. There are several seamed cup
variations:
- Horizontal seams - This seam design tends to give a more projected and slightly conical shape to the cup.
- Vertical center seams - More commonly found in demi or balconette cup shapes, this vertical center seam is very supportive and gives an uplifting effect to the breasts.
- Transversal seams - This seam type is arched or curved in shape, and thus gives a more rounded shape to the breast tissue while also being very supportive.
- Diagonal Seams - provide support, centering and lift to the
breasts. And the diagonal design (generally starting low in the center
and getting higher at the sides) also gives a very flattering appearance
to the wearer.
Types of Multi-Part Cup Bras- 2-Part Cup Bras
- 3-Part Cup Bras
- 4-Part Cup Bras
- 5-Part Cup Bras
More on Support Panels/Slings:
Women with C cup
sizes and larger can benefit from a bra with support panels or
slings. Especially if their breasts are pendulous, are large or
fall to the sides. In these cases especially, panels can lift,
center and support your breasts for a better shape and profile.
3. Underwires
 A bra with underwires gives the best shape and definition to a bustline.
So, it’s worth the effort to try and find an underwire bra that fits
you properly. Understanding underwires and how they are sized can go a
long way in helping you find the perfect underwire bra fit.
A bra with underwires gives the best shape and definition to a bustline.
So, it’s worth the effort to try and find an underwire bra that fits
you properly. Understanding underwires and how they are sized can go a
long way in helping you find the perfect underwire bra fit.Breasts have a diameter measurement and a projection measurement - distance the breast tissue protrudes from your chest wall. When you select a cup size like a C or G, you are making a breast projection measurement selection. The breast diameter measurement is pre-determined by the manufacturer and built into each band size. So, changing your band size also changes your underwire diameter. Here is an example. Going from a 34C to a 36C takes you up one breast diameter measurement. Going from a 34C to a 36B keeps the same breast diameter measurement. This is why going up a band size means you also need to go down a cup size if you want to keep the same cup volume. Confused? You’re not alone.
Manufacturers use the exact same underwire size in multiple band sizes. For example, the actual underwire used in a 36B is the exact same underwire used in a 34C, 32D and 30E. All of these bras have the same breast diameter; just different breast projection measurements in relation to the band size - but all have the same cup volume. The chart below makes this a little more clearer. Find your size on the chart and note the color in the box. All the other sizes in the same diagonal color stripe use the exact same underwire size:
30A
|
30B
|
30C
|
30D
|
30E
|
30F
|
30G
|
30H
|
30I
|
32A
|
32B
|
32C
|
32D
|
32E
|
32F
|
32G
|
32H
|
32I
|
34A
|
34B
|
34C
|
34D
|
34E
|
34F
|
34G
|
34H
|
34I
|
36A
|
36B
|
36C
|
36D
|
36E
|
36F
|
36G
|
36H
|
36I
|
38A
|
38B
|
38C
|
38D
|
38E
|
38F
|
38G
|
38H
|
38I
|
40A
|
40B
|
40C
|
40D
|
40E
|
40F
|
40G
|
40H
|
40I
|
42A
|
42B
|
42C
|
42D
|
42E
|
42F
|
42G
|
42H
|
42I
|
44A
|
44B
|
44C
|
44D
|
44E
|
44F
|
44G
|
44H
|
44I
|
So, here’s how you can use this new-found knowledge. You find a bra that fits perfectly in the cups but the band is too tight. You look at this chart, find your size, follow the diagonal downward and there is your bra size with just a larger band size. The cup size went down one size as you went up a band size. But both cups use the same underwire so you know your cups will be the same. Conversely, want a smaller band size but with the same cup volume? Follow your diagonal upward to get the same cup size but with a smaller band size.
This chart also explains why an underwire swimsuit labeled as a "C" cup will not fit all C cup women; you really need to know what underwire size was selected to represent "C" cups. For you analytical types, the standard diameter deviation between underwire sizes is about 3/8". The standard underwire length deviation between sizes is about 5/8".
 Underwire
design is also important. An underwire is designed to have some
spring. Usually made of heavy gauge wire, sheet metal or a plastic,
underwires are designed to splay or spread wider once a bra is put on
and fastened. It’s kind of like stretching a spring. Once the bra is
removed from your body, the underwires return to their original shape.
This horizontal pulling on the underwires gives you additional support
and containment to your breasts - especially so for strapless bras.
Underwire
design is also important. An underwire is designed to have some
spring. Usually made of heavy gauge wire, sheet metal or a plastic,
underwires are designed to splay or spread wider once a bra is put on
and fastened. It’s kind of like stretching a spring. Once the bra is
removed from your body, the underwires return to their original shape.
This horizontal pulling on the underwires gives you additional support
and containment to your breasts - especially so for strapless bras. Do you have a problem with your underwires breaking in their middle? If so, it’s because too much horizontal pulling is taking place with your underwires. Your breasts are in too small an underwire and their weight and pressure are causing eventual breakage. Or your band size is too small and the excessive pulling apart of the underwires causes their eventual breakage.
Are all underwires shaped the same? For the most part, yes. But there can be some differences. Many lingerie manufacturers claim their underwire grading and shaping to be their secret behind their unique fit. So, this could be a reason why you find one bra brand fitting your differently than another
There are many different underwire lengths as well. Demi cup low-plunge bras and petite bra styles have shorter wires due to their design. Thus these specific bra styles can be a great choice for a petite or short-waisted woman who has issues with underwires coming up too high in the center or under their arms. The longest underwires are used in strapless bras. Since a strapless bra does not have the benefit of straps for support, having more underwire surrounding and containing the breast helps give the needed support to keep a strapless bra up and in place.
4. Bra Band
Also known as a "bra frame" or "bra base," a bra band is that part of a bra that goes around a ribcage. It’s a term that also includes the bra’s sides and back. A bra’s band is designed and engineered to carry the weight and thrust of your breasts. A bra band is what determines how your band size will fit and feel. This is why its so important that you find your correct band size - too tight and your underwires can dig into your ribcage; too loose and your breasts won’t have proper support.
A bra’s cups are sewn either into or onto a bra band. Some bra designs have what is called a "bandless" or "floating cup" design meaning that the cups are not sewn onto a band underneath them. Instead the band is sewn onto the outer edges of each cup and has no presence in the front of the bra. This bra design gives a lighter look to the bra, but can compromise your support - especially if you have larger breasts.
A bra designed with a bra band that goes all the way around your torso will give you the best support. And, if that bra band is made of Powernet (a very sturdy knit fabric that is also used in extra firm compression garments) you have the strongest support possible without having so much stretch that the bra will shortly stretch out. There is an important point to be made here. Bras that can be easily stretched from end to end, have a much shorter life than those bras with little stretch. So, if you want a bra to last longer and stretch out less, look for a bra where the band is made with a powernet.
Some women can have a problem with their band flipping up or folding under their arms. This is a common problem in the larger band and cup sizes, and also with full-busted petite women. One reason could be that the brand size is too small. Another could be the manufacturers inexpensive and stretchy fabric choice for the band. Assuming you have your correct band size, one solution is to look for bras with bands made in powernet, and/or a band with boning sewn vertically along the sides.
5. Center Panel (Bridge)

Here are some additional facts about a center panel. The wider the center panel, the better the bra will fit a woman with wide-set and splayed breasts. Most front closure bras, because of the clasp, have sider set cups as well. Most minimizers do not have a center panel. Bras where the underwires are short in the center have a very thin - if any - center panel, and this style is great for a woman with close-set breasts.
No Center Panel
Wide Center Panel.
Plunge style bras have become very popular in the last few years. This style allows you to wear a low neckline without your bra showing. But, you need to be careful with these styles. The center panel many times is simply a small piece of tape, or there isn’t really a center panel at all. In these cases, the center support of the bra is compromised, and for larger cup-sized women with less firm breasts, bending forward could find your breasts falling out of these types of bra.
Corded Center
Panel
For your technical types, the center panel on many bra styles actually decreases in width as the cup sizes increase. This makes sense when you remember that as breasts get larger, they also get closer together. The center panel width at the Apex line generally measures as follows: AA=1-1/2", A= 1-1/4", B=1", C= 3/4", D and larger =1/2". Also, the center panel also usually increases in height as the cup size increases.
6. Bra Sides/Back (Bra Wings)

Do you want to know if your bra is made with quality fabric that will last a long time? Do the stretch test. Simply stretch your wings. An inferior fabric that is somewhat flimsy and overly stretchy fatigues quickly. This fabric won’t be very supportive and will stretch out after just a few months of wear. Instead, you want the wings to have a resistant stretch. If a bra’s sides and back are made with powernet, this is the best fabric to be used. Powernet is also the fabric used in high-end compression garments. It has a resistant stretch that will give you great support and last for many wearings without becoming stretching out. An important note her is that you should have 3 bras that you rotate - one to wear, one to wear the next day, and one to wash. A bra should be allowed to rest at least 24 hours between wearing again so that the fabric has the opportunity to return to its original shape. This will greatly increase the life of your bras.
7. Back Hook Counts

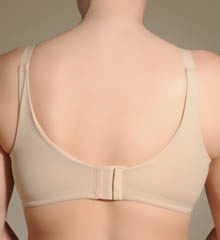 Here is an example of a very supportive bra with a pared down back hook
count. This bra is still supportive, but incorporating a leotard back
design, the back looks lighter while still giving great support.
Here is an example of a very supportive bra with a pared down back hook
count. This bra is still supportive, but incorporating a leotard back
design, the back looks lighter while still giving great support.Back Coverage
How a bra back is designed has a lot to do with whether or not you will have bulges, or what is now being called back fat. As we get older, the tissue on our back becomes softer. Any pressure will create indentations or flesh bulges. The two examples above tell the story. The bra back on the left has more coverage and curving lines. This back design will mitigate back bulges. The design on the right has thin straps and a narrow back. This style will absolutely give you back bulges if you are prone to back fact. Both backs above are considered to be leotard back styles. So, it is incorrect to assume that as long as the back is designed with leotard styling that it will eliminate back fat.
There are several options now on the market to reduce or eliminate back bulge. The first is a simple purchase of a shapewear camisole. This garment can be put on over any of your existing bras to give you a smooth back. You can continue to wear your existing bras while eliminating that worrisome back fat. And another solution is to pay more attention to the back design of your bras. More and more companies are creating bras with greater back coverage and/or designs that tend to mask the bulging. Back bulge can now be considered a problem of the past.
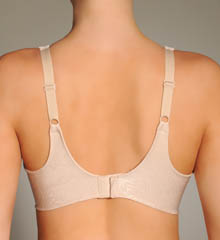
8. Bra Straps

- The straps are too wide-set both in the front and back of the bra.
- The straps have been sewn on at an angle.
- Ring hardware attaching the straps to the back of the bra allow for too much swivel.
- If you’re using bra back extenders, they are moving the straps too far apart.
- You have shallow upper breasts which creates a hollow in the upper half of your cup thus causing your straps to fall off.
If strap slippage is a common problem for you, the trick is to find a bra where the straps are either sewn closer to the center in the front or the back. You've probably never really noticed how your straps attach to the back of your bra. Well, after reading this, I hope it becomes one of the first things you look at. How the shoulder straps are attached in back can tell you a lot about how the bra will fit. There are basically two types of strap attachments: camisole and leotard.
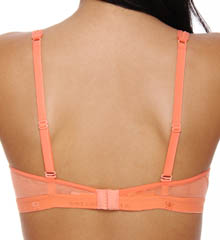
Camisole Back
Leotard Back
The camisole strap attachment style has the straps sewn onto the back at a right angle - creating a box-like shape with the bra back. This strap attachment style has been around the longest and is also used on traditional camisoles and slips. The camisole attachment style works for all bra sizes, and is particularly good for larger bra sizes because it allows the bra back to have as many hook closings as necessary; allows the straps to be made out of elastic or a rigid material; and can be easily altered. This style also allows for a new back strap adjusting feature known as "kicked in straps" where the back has a number of tabs long the back to allow for the straps to be attached either closer or farther away.
The leotard strap attachment is a fairly new design in bras. It has also been called the "U back." Rather than a rectangle shape like the camisole attachment, the leotard attachment gives a round look on the back - similar to the look of a leotard. It has fast become the most commonly found strap attachment technique in today's ready-to-wear offerings. And, recently some bra manufacturers have been claiming it as their own unique design when in fact, it’s been available for years now. Besides looking different, the leotard back style almost always includes elastic to achieve the rounded shape. This elastic gives the wearer flexibility to raise her arms or bend over without having to adjust her bra afterwards.
There are a few challenges to a leotard strap attachment. The straps attach to the back at a bit of an angle to keep the arch styling. If the "U" shape is too wide , the straps can fall off the wearer's shoulders. The number of back fasteners is also limited with this strap design. But, this style gives a pretty line to your back.
The strap hardware can also impact how a bra strap will fit. Many bra straps have metal or plastic rings on each strap to aid in the length adjusting of your bra straps. When this ring is sewn directly on to either the top of the cup or the bra back, it will allow the strap to swivel to the right or left so that it falls in a more comfortable location for the wearer. If you have sloping shoulders or are prone to having your straps fall off, avoid bras with rings placed in either of these locations. Speaking of strap hardware. We often are asked why strap adjusting hardware is almost always in the back rather than the front. After all, if it’s in the front, it would be so much easier to adjust one’s straps correctly. Well, there are several reasons why manufacturers have determined that strap adjusting should be relegated to the back. First, there is the opportunity to have lace or some design detail on the front of the straps to make the bra look more beautiful. This would not be possible if the adjusting was done in the front. Second, depending on your height, the adjusting hardware could end up on the top of your shoulder which could be very uncomfortable. Third, the adjusting hardware can show though form-fitting clothes if in the front. So, for all these reasons, almost all bra straps adjust in the back.
As for how the straps attach to the front of the bra, there are two things to look for. For the best support, the straps should attach directly above the apex or point of each breast. We call this a "center pull" strap. Balconnette and demi-cup bras have the straps attached closer to the shoulder. There are two reasons: first, wider straps will accommodate a wider neckline, and second, straps attached on the outside of the bra cup create more cleavage by spilling the breast tissue towards the center. If you are prone to having straps fall off your shoulders, you should not select bras with wide-set front straps.


No comments:
Post a Comment